Custom Vehicle Table: Adding, Changing, and Deleting Vehicle ID
Adding New Vehicle ID
- Select a Brand and click All Products.
- Click the Applications segment and select a product from the catalog.
- Click on the Add New Application button.
4. A new window appears. Click the Edit VCdb button.
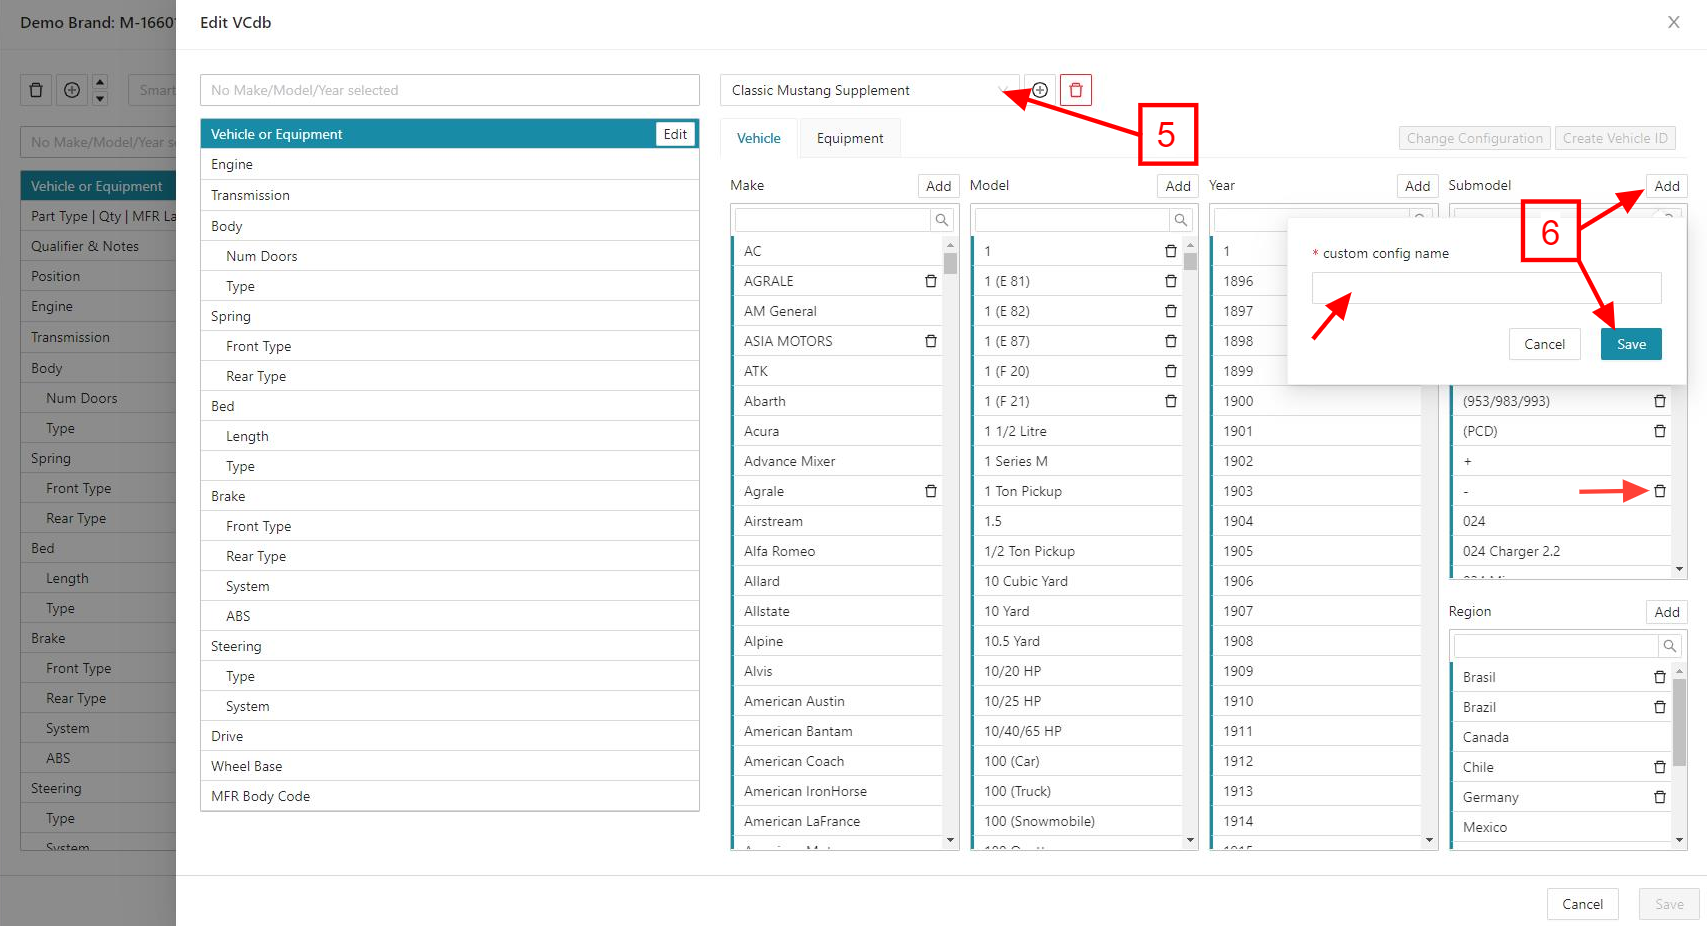
5. Select a Custom Vehicle Table from the dropdown menu.
6. To enter new values for Make, Model, Year, Submodel, and Region, click the Add button for each column, enter a value and click Save. Click on the Trashcan icon next to each value to delete them.


The default selection for the Sub-model is "Base".
7. Select the desired values to add from the list. Click the Create Vehicle ID button and click Save.
 Press F5 to refresh the page if you don't visualize saved changes right away.
8. Select the Custom Vehicle Table from step 5. Now the newly added vehicle becomes a valid combination (color coded Green). Please don't forget to Save your changes.
Change/Delete Vehicle ID
1.
Click Edit VCdb button.
2. Select a Custom Vehicle Table, then select
the combination of
Make, Model, Year, Submodel and Region, and click on Change Configuration.
Change the necessary values ( they will show invalid and red-colored until saved), and click on Confirm Change.
A pop-up will show, click Confirm, and then click on Save to keep the changes.
 Press F5 to refresh the page if you don't visualize saved changes right away.
 3. Now, you can visualize the changes as valid values by selecting the Vehicle Table and setting the previous saved combination. Click on Edit VCdb once again.
A pop-up will show. Click on Delete if that is the desired action.
Related
Articles:
- Custom Vehicle Table: Overview
- Custom Vehicle Table: Adding a New Custom Vehicle Table
- Custom Vehicle Table: Adding New Sub Configurations and Assigning to Vehicles
- Custom Vehicle Table: Importing/Exporting
Related Articles
Custom Vehicle Table: Adding a New Custom Vehicle Table
Adding a New Custom Vehicle Table Adding a new custom vehicle table through Application segment: Select a Brand and click All Products Select the Application segment and select a product from the catalog Click on the Add New Application button 4. A ...Custom Vehicle Table: Overview
Custom Vehicle Table Overview Custom Vehicle Table allows the user to expand the Autocare VCdb table by configuring products for the vehicles that were not officially sold in the USA, and add custom configurations to the existing vehicles in the ...Custom Vehicle Table: Adding New Sub Configurations and Assigning to Vehicles
Adding New Sub Configurations and Assigning to Vehicles Select a Brand and click All Products. Click in the Application segment and select a product from the catalog. Click on the Add New Application button. 4. A new window pops up. Click on the Edit ...Custom Vehicle Table: Importing/Exporting
Importing/Exporting Values in the Custom Vehicle Table The Import/Export feature allows you to work with Custom Vehicle Tables in Excel format. This gives you the option of adding new vehicles by editing values in excel and then importing. Click on ...Adding and Deleting Digital Assets in the Application Segment
Adding and Deleting Digital Assets in the Application Segment PDM tool has two options to add and delete the digital Assets in the application segment, Adding/Deleting Digital Assets using Edit Application. Adding/Deleting Digital Assets using ...